
Battle Is Joined
Preview Combat in Runewars Miniatures Game

“Place me at the head of a mustered Army of the Realm, my peers, and I will venture forth to eradicate the traitor in the Mistlands and the undead with him.”
–Baron Zachareth of Cartridge, speaking in the Council of Thirteen
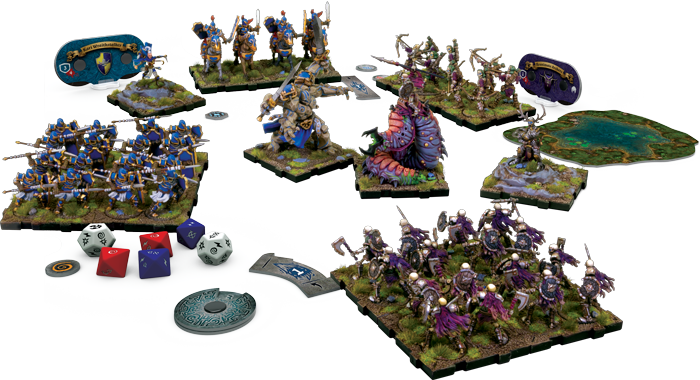
The great battles of Terrinoth are beginning, as Waiqar’s undead grow more bold with every passing day. Waiqar the Undying will soon make his next move to cover the world in darkness, and only the legions of the Daqan Lords dare to take up arms and stand against him. In Runewars Miniatures Game, you will choose your side and take your place in the next great war.
We’ve already taken a closer look at several aspects of Runewars Miniatures Game. We interviewed designer Andrew Fischer to explore the thought that went into the game’s design. We took a closer look at the command tools that grant you precise control over your units on the battlefield. And last week, we marched onto the battlefield itself as we previewed the different ways your units can move.
Today, however, we turn our attention to the fundamental struggle between man and undead—the brutal combat of Runewars, and how you can lead your units through the coming battles.
Draw Your Swords
Once your units have maneuvered into position, you’ll be ready to attack your opponent’s units, whether you’re drawing swords and entering the frantic scrum of melee combat or striking from afar with arrows or magic. Every attack can slay enemy figures and every unit you destroy is worth victory points at the end of the game, along with the objectives you complete. (We’ll take a closer look at objectives in our next preview.)
Waging war is no easy business, however, and dozens of figures will die on both sides before your battle is done. You’ll kill enemy figures by making attacks, but your units won’t simply seize any opportunity to attack—instead, you must prepare your attacks by plotting a melee or ranged attack on your command tool.

The outcomes of your attacks are decided by rolling custom dice. Every unit has one or more attack profiles along the bottom edge of its unit card, and these attack profiles determine the dice your unit rolls in combat. For instance, the Daqan Lords’ Spearmen rolls one red die and one blue die during melee combat. Because the Spearmen don’t have a ranged attack profile, they’re incapable of making ranged attacks.
The dice that you roll feature a variety of symbols, and each symbol allows you to gain the upper hand in a different way:
 Hit - Hits can be spent by the attacker to deal damage and possibly inflict wounds. This is the fundamental way for you to destroy enemy units.
 Surge - Surges are used to trigger special abilities. These special abilities may be found on your unit card or an upgrade card attached to your unit.
 Mortal Strike - A mortal strike deals one wound to your target, regardless of that unit’s defense. This powerful symbol is only found on the white dice wielded by the mightiest warriors.
 Morale - At the end of the attack, you can spend morale symbols to inflict a morale test on the defender. We’ll explore morale tests in more detail later in this preview.
 Accuracy - The accuracy result lets you target a specific figure in the enemy unit, perhaps forcing your opponent to deal wounds to a commander, rather than a simple foot soldier.
The most common way to receive these symbols is from your attack dice, but they may also come from your modifier dial. For instance, when you plot a melee attack on your Spearmen action dial, you can also plot a hit symbol on the modifier dial, which automatically adds a bonus hit to your attack! Other units can supplement their attacks by adding other symbols, including surge, morale, or accuracy results.
Multiply Your Force
The dice that you roll during an attack are always determined by your unit’s attack profile, and you’ll roll the same dice, whether your unit has thirty figures or three. The size of your unit does have a significant impact on your attacks, however, and every rank and column of figures is important.

In this case, three hits, split between your dice and your modifier dial, translates to nine damage!
Wider units can bring more fighters to bear against the enemy, which directly translates to more damage. While you’re making an attack, each hit symbol (whether it comes from your dice or your modifier dial) deals damage equal to the number of figure trays facing your target. So, in the example above, a block of Spearmen is attacking a group of Reanimates. Because the Spearmen have three trays in the rank facing the Reanimates, their three hit results will deal nine damage!
In a massive block of infantry, even warriors behind the front ranks can contribute to the battle by the sheer weight and pressure of their bodies. For every full rank of trays behind your unit’s front rank, you can choose and reroll any number of dice in your attack, giving you better odds of dealing maximum damage. Even a partial rank (a rank with fewer trays than your front rank) allows you to reroll a single die in your attack!

Hold Your Ground
An enemy attack may deal significant damage, but that doesn’t necessarily translate into an equal number of dead figures. In the upper left corner of every unit card, you’ll find that unit’s defense and its wound threshold, as you can see above. The defense value is the amount of damage the unit must suffer in order to take a wound, and the wound threshold is the number of wounds that each figure can take.

Because the Reanimates have a defense of one and a wound threshold of one, nine damage translates to nine killed figures.
As an example, the Reanimates from our earlier example have a defense of one and a wound threshold of one. This means that every damage will inflict one wound, and one wound will kill a figure. If the Spearmen are dealing nine damage to the Reanimates, then they will remove nine figures from the enemy formation, as shown above.
Of course, there are ways to increase your defense. Almost every unit can plot a modifier that raises its defense strength, which can significantly reduce casualties. If the Reanimates above had a defense value of two, nine damage would only kill four figures—the final point of damage would not surpass the Reanimates’ defense, and it would be lost.
Even the most heavily armored unit can still be terrified or have its spirit broken, however. After your attack, you can spend your morale results and any morale tokens on the defending unit to test the unit’s might. The number of morale symbols spent determines the number of cards that you draw from the morale deck. For instance, if you inflict a morale test with two morale symbols, you’ll draw two morale cards from the deck.
Morale cards feature a number of dangerous results, and receiving any one of them at the wrong time could be disastrous. A unit may be cast into Disarray, forcing it to suffer a stun token, while a Loss of Faith removes an entire tray from the unit. Enemy soldiers may even suffer from Uncertainty, letting you perform a reform action with the enemy unit, turning it to face whatever direction you choose!


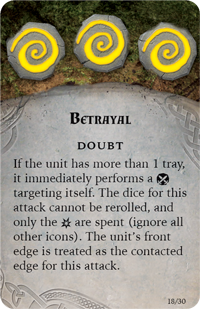
You’ll also notice that each morale card features a number of icons at the top of the card. The number of these symbols limits which cards you can trigger—for example, if you inflict a morale test with two morale symbols, you can trigger Uncertainty, but not Betrayal. Inflicting terror, doubt, and confusion on the enemy ranks is a crucial part of achieving victory in Runewars Miniatures Game, and the best commanders will consistently use it to their advantage.
Lead Your Army
The enemy ranks are drawn up across the valley—and soon, blood and carnage will overwhelm this pastoral scene. Join us for our next preview, as we explore the setup for each battle and the objectives you pursue, and remember to pre-order Runewars Miniatures Game at your local retailer today!
Related Products
Runewars Miniatures Game


