
Legion 101: Mechanics, Part II
The Basics of Combat in Star Wars: Legion
![]()
In our last Legion 101 article, Zachary Barry covered everything leading up to a battle of Star Wars™: Legion, including the requirements for your army and defining the battlefield you'll be playing on. Today, Barry is joined by L.J. Peña to walk you through leading your troops into battle!
Now that you have the basic mechanics in your repertoire, it's time for us to take the next step and tackle the strategy involved in a game of Star Wars: Legion!
In Legion, there are a lot of variables and thought processes to go through each and every step of the game. For example, each unit on the table only has a max of twelve actions per game. You should have a plan for how that unit will spend those actions. We are going to do our best to keep this simple yet informative—there’s no need to complicate it! The focal points of this article will be Command Cards and Orders as well as Actions, Combat, Cover and Suppression.

Command Cards
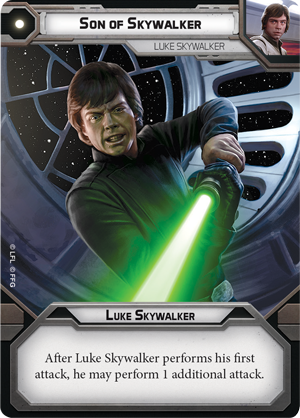
Command Cards represent decisions and abilities that your commander makes during the course of a game of Star Wars: Legion. Choosing which card to play may not seem like a difficult decision in the moment, but deciding when to play these cards is a critical part of Legion. Command Cards not only decide the minimum number of orders you can give out, but also which player gets to activate a unit first on that turn. You also have to consider when the right time to play a certain card is. Take Luke Skywalker's one pip, Son of Skywalker. Although this card gives us the freedom to activate Luke Skywalker when we want to—and could allow you to go first—he likely won't be able to attack anything on his first turn, and you won't get the full benefit of the card!

There are a lot of factors that should go into your decision making when using a Command Card. Players often use Standing Orders, the generic four-pip card that allows you only one order, during round one in order to keep your lower pip cards for later. But using a card like General Veers' Maximum Firepower on turn 1 to take a couple of wounds off a vehicle before it activates may be more valuable to your battle plan.
The following examples can help you choose when to use the generic cards you get from the Core Set. You generally want to play Assault early on, especially when you need to get a lot of orders out on the table to control when your important units activate. Push and Ambush are cards you want to play later on in the game, mostly in very important situations when you need to go first. Even though the generic cards do not give you a bonus effect in the game, these cards help you save powerful abilities for when you really need them. They can also serve as useful backups if you lose your commander. Command Cards call for a deep thought process; knowing when to play your cards to their full effect takes practice and a little bit of luck!
Orders
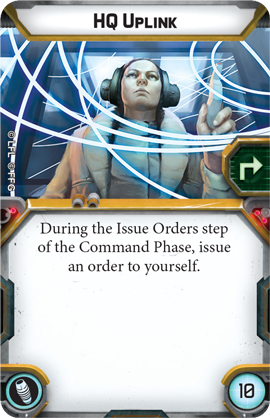
One of the major components of Star Wars: Legion is issuing orders to your units. A unit is issued an order when it comes directly from a Command Card, through an ability like the B1 Battledroid’s Coordinate, or by exhausting an HQ Uplink. Issuing an order to your units means you will have better control over when that unit activates, and can also trigger various abilities. If you do not issue an order to a unit at the start of the turn, all of your remaining orders are randomly shuffled in an order pool.

After General Grievous issues orders to a unit of B1 Battle Droids, they can use their Coordinate ability to issue orders to another unit of B1 Battle Droids until every unit of battle droids has received orders!
Giving your key units like General Grievous and Obi-Wan Kenobi orders is integral to the success of your list during a game. While they don’t always need an order, these pieces will often make a difference between victory and defeat. Being able to hold on to them until the end of your turn, or move a unit that is holding on to an objective when you need to is usually very important to success. It is also important to note that you can sometimes get perfect control from your order pool by issuing to all of your non-corp units and then your pool is only corp units, removing the randomness from drawing. This is actually a common Droid tactic, which L.J. will talk about in a future article!
Actions
As we mentioned earlier, your units will have a total of twelve actions per game. That is assuming they survive all six rounds without losing an action to suppression. This is not a lot. Getting every ounce of efficiency out of your army takes planning as soon as the battle cards hit the table and does not stop until the final die roll. One of the most important things to remember when discussing actions is the fact that there is only one action that you can normally do twice in a turn: move. You might think that double moving is not the greatest of things to do but you’ll be surprised how many times you’ll find yourself doing this to get into a better position for a following turn, or get a unit out of harm's way.

The following questions are things you can ask yourself: “Do I move and shoot?”, “Do I shoot and move?”, “Do I aim and shoot?”,“Do I move and dodge?” so on and so forth. The point is this: your mind will continually be asking and assessing the situation in front of you, especially if you play the new Clone faction with their token passing. You’ll always find an answer to your questions, whether those answers were the right ones, you won’t find out until the end of the game!
Combat, Cover, and Suppression
As the game evolves, shots are fired and dice are rolled. This is when decision making can get very complicated. If you start taking fire from your opponent, you will inevitably begin losing models and gaining suppression. You’re going to start losing actions, and the best advice we can give is: don’t let your mind—or units—panic. This is normal in a game of Star Wars: Legion.
As a player, you need to try and find the best available action you have remaining and take it. Sometimes that will be a shot back at your opponent, sometimes it may be a move to get behind line of sight blocking terrain and save yourself from taking more fire from your opponent. You might also be able to mitigate the effects of suppression through abilities, or good old fashioned dice rolling. Knowing how to move through cover so you can minimize damage from return fire, and mitigate suppression are other skills that take time to master. They will be covered in relation to the new factions in another article!

As your units take fire, they gain suppression tokens which cause them to lose actions and maybe even panic.
Combat during a game is often referred to as the “attrition war,” where the strength and effectiveness of your army will be reduced through sustained attack and pressure. The key during this time is to be the one applying the pressure or to stay calm while under pressure. Always remember: even when you feel like your back is against the wall, you can try and find a way out of it with your decision making. A common in game example is when your opponent applies pressure on you with heavy fire, they might take their mind off the objectives and focus too much on winning the attrition war. This might be an opportunity for you to sneak away with an objective and win the day.
Again, this is all relative to both players, the game of Star Wars: Legion, and the plethora of decisions that need to be made during the game. Win or lose, though, make sure that you have fun and enjoy this awesome game!
And that's it for the basic mechanics of the game! Join us next time as we begin taking a look at some of the decisions you can make with Star Wars: Legion's specific factions. In this case, we'llexamine strategic thinking with the Clones and Droids from the Galactic Republic and Separatist Alliance. See you then!
No products found.
Related News


Smooth Talking Smuggler
Check Out Our Preview of the Lando Calrissian Commander Expansion for Star Wars™: Legion

The Hunt Continues
Check Out Our Preview of the Agent Kallus Commander Expansion for Star Wars™: Legion
