
Fight for Freedom
Preview Two New Rebel Heroes from Twin Shadows

“Nevertheless, I’m taking Captain Solo and his friends. You can either profit by this or be destroyed. It’s your choice, but I warn you not to underestimate my power.”
–Luke Skywalker, Star Wars: Return of the Jedi
Even across the Outer Rim, Tatooine is well-known for its lawlessness. When Han Solo disappears on an information-gathering mission in Mos Eisley, two of the Rebellion’s best operatives are dispatched to find Han and help him defeat whatever dangers he has discovered on Tatooine. You’ll need all of your skills to help the smuggler elude the Imperial presence on the Outer Rim.
Your adventures take you to Mos Eisley in Twin Shadows, a new expansion for Imperial Assault! Within, you’ll find new content for your Imperial Assault campaigns and skirmishes. You can help Han Solo battle Imperials on Tatooine in a new mini campaign, or take advantage of new Command cards and skirmish missions to battle a friend in your skirmish games. Whichever game you play, you’ll be able to take advantage of the two new heroes that join the Rebel Alliance in Twin Shadows. Today, we’ll preview these two new heroes in the campaign and skirmish games for Imperial Assault.

Lead the Assault
The first hero to join the Rebels in Twin Shadows is Biv Bodhrik, a guerrilla warrior driven by his need for vengeance. Biv is a formidable warrior, proficient with all kinds of weapons, and you can use his strength to strike a blow for freedom in Imperial Assault.
During your campaign, Biv Bodhrik features two powerful abilities that allow him to take vengeance on every member of the Galactic Empire. By taking two strain and spending an action, Biv can use Close and Personal. This special ability allows him to perform a melee attack with a red die and a yellow die. Then, you can make an additional attack with a ranged weapon that targets the same figure. Anytime you combine two attacks into one action, your potential damage skyrockets. Most Imperial figures would fall to this double attack, but if you just don’t roll enough damage, Biv Bodhrik can get a second shot with Deadly Precision. By suffering a strain while you’re attacking, you may reroll any attack die, giving you an even better chance of destroying those who stand in your way.
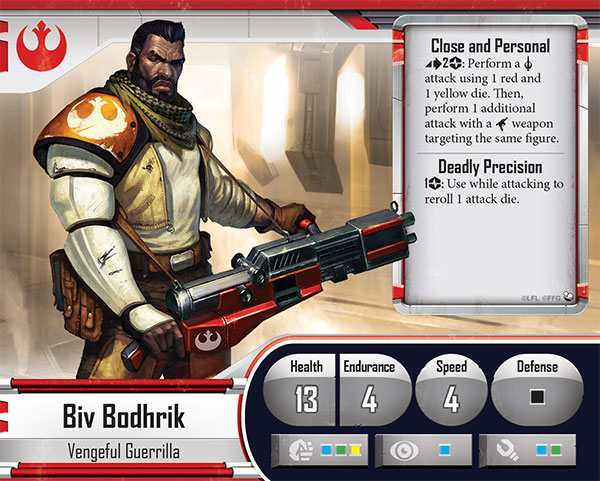
As you play Biv Bodhrik throughout a campaign, you can increase his powers with the cards from his Class deck. You may use Advance to keep moving as you defeat enemy figures, or Final Stand to recover strain, move, and use Close and Personal, all in one action. Biv Bodhrik also introduces Class deck items that can be purchased by spending their XP cost. For example, you may affix a Vibrobayonet to your gun. When you use the Close and Personal ability, the Vibrobayonet makes your melee attack much more dangerous to any servant of the Empire who stands in your way.

Biv Bodhrik can be a deadly force for the Rebel Alliance in your skirmishes as well. He features a punishing amount of attack dice, and his surge abilities allow you to add more damage. Biv can also spend an action on the Close and Personal ability. This ability provides essentially the same effect as in the campaign game, allowing you to make a punishing melee attack before attacking your same target with a ranged attack. In a skirmish, of course, killing enemy figures is one of the main ways you gain victory points, making Biv Bodhrik a valuable asset when you’re taking down enemy figures. You’ll want to try to keep Biv alive when he rushes into combat, so he also features the Into the Fray ability, which grants a permanent block as long as Biv is close to at least two hostile figures. This ability gives Biv the time he needs to destroy as many enemies as possible.
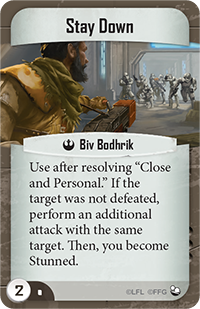
You can maximize the carnage you create with Biv Bodhrik by playing the Stay Down Command card after he resolves the Close and Personal ability. If the target of your attacks was still not defeated, you can perform an additional attack against the same target, potentially felling even the greatest servants of the Galactic Empire. After his attack, Biv Bodhrik becomes Stunned, but that’s a small price to pay for destroying the Empire’s soldiers.
Mechanical Genius
As you explore the dingy cantinas and trash-filled alleys of the Mos Eisley, you can benefit from the technical expertise and underworld knowledge of Saska Teft, a brilliant engineer who’s recently joined the Rebel Alliance.

In the campaign game, you can use Saska Teft's constant tinkering to create useful devices for her and the other members of your team. By suffering a strain during her activation, Saska can claim a device token or give one to an adjacent friendly figure. These devices have no inherent power, but Saska Teft can use her abilities to give them any kind of function. For example, Saska bears the Practical Solutions ability, which can be used by any figure. Whenever a figure declares an attack, he may discard a device token to apply a bonus surge to the attack results. Alternatively, you may discard a device token to reroll one die while performing an attribute test. However you put Saska Teft’s abilities to use, her unorthodox devices can tip the course of a campaign in your favor.

Saska Teft’s Class cards offer additional uses for her device tokens. For example, if Saska has the Energy Shield Class card, any figure may discard a device token while defending to apply a bonus block or evade to the defense results. This ability can even be used multiple times per attack, potentially neutralizing even devastating attacks. Alternatively, you may use your device as an Adrenaline Injector . When you have this Class card, any figure can suffer a strain and discard a device token to gain two movement points and become Focused. The ability to Focus on command can dramatically increase the amount of damage your heroes deal to the forces of the Empire.
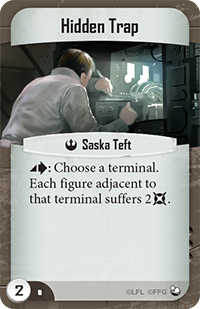
When you play Saska Teft in the skirmish game, she leaves her device tokens behind, but she still has the engineering brilliance that’s so useful to the Rebellion. Saska features a host of surge abilities to damage her opponents, and she can inflict the new Weakened condition, which decreases a figure’s surges and evades until the end of his activation. Saska Teft may also use her Unstable Device action to combat clustered squads of figures. Unstable Device allows you to choose a space within three spaces of Saska and roll a yellow die. All figures on or adjacent to the space suffer the amount of damage rolled, and Saska suffers one damage. Since your opponents don’t roll defense dice for this damage, any damage you roll is sure to stick. You may also lay a trap for your opponents with the Hidden Trap Command card. This Command card lets you choose any terminal and force every adjacent figure to suffer two damage. A cunning Hidden Trap makes it much easier for you to seize the terminals for yourself.
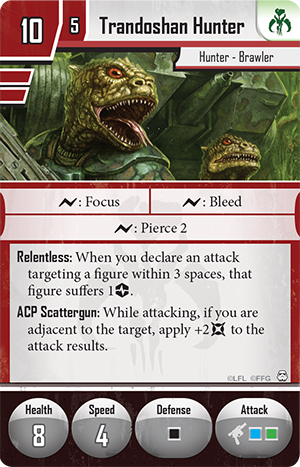
Saska Teft’s final ability is Shady Contacts. Crucially, this ability changes how you build your squads for Imperial Assault. Previously, if playing the Rebel Alliance faction, you could not use units from the Imperial or Mercenary factions. With the Shady Contacts ability, you can include one non-upgrade Mercenaries Deployment card in your army. If you’ve ever wanted to hire IG-88 or tap the raw damage potential of the Trandoshan Hunters , Saska’s contacts can help you close the deal.
Venture into Mos Eisley
Two new heroes are eager to fight for the Rebel Alliance, but countless dangers wait in the depths of Mos Eisley. In our next preview, we’ll explore the new figures available to the Imperial player in the Twin Shadows expansion.
Pre-order Twin Shadows at your local retailer today!
Related Products
Twin Shadows
Related News


Raiding the Opposition
The Gray Cap Cantina Raid is Now Available in the Legends of the Alliance App

2019 Star Wars: Imperial Assault Prime Championships
Prizes, Dates, and Locations for the Imperial Assault Prime Championships

