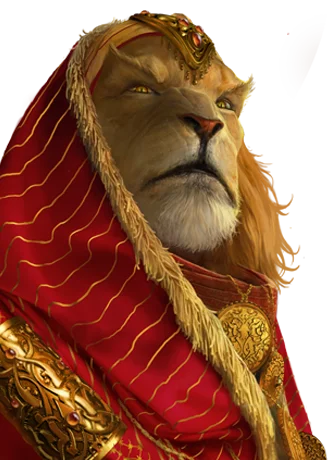

“Hell’s Kitchen is now under the protection of the Hand!” – Daredevil
Even the most virtuous heroes are no strangers to darkness. Between facing off against ever-deadlier villains and battling their own inner demons, our heroes must always take care not to stray from the right path, or else they may end up succumbing to that darkness, one way or another. No one ever said that heroism was easy, but when a sinister being uses his corrupting magic to transform heroes into his loyal minions, protecting the innocent just became a whole lot harder.
Fantasy Flight Games is proud to announce the Shadowland Scenario Pack for Marvel Champions: The Card Game!
This extra-large, 90-card scenario pack—guest designed by former Marvel Champions designer Michael Boggs—drops into the scene with three brand-new scenarios to challenge our heroes. Face off against the shadowy organization known as the Hand and their legion of ninjas, acolytes, and possessed heroes; navigate the twisting and deadly halls of Shadowland itself as you hunt for their leader; and face off against that leader—the demon called Krahllak—in a dangerous showdown that slowly corrupts your hero over time. As always, each of these scenarios can be played as standalone experiences; however, for the first time since the MojoMania Scenario Pack, you can also play these scenarios sequentially as part of a short, three-scenario campaign!
We’ve got a lot to cover today, so let’s dive right in and see what these scenarios have in store!

The Dark Protégés
The first scenario, Shadows in the Night, has you battling the Hand as you lay siege to their fortress, the titular Shadowland itself. You need to break through the defenses of one of Krahllak’s Dark Protégés in order to win, and they’re not going to make it easy for you.
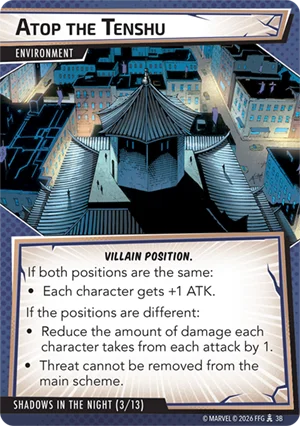
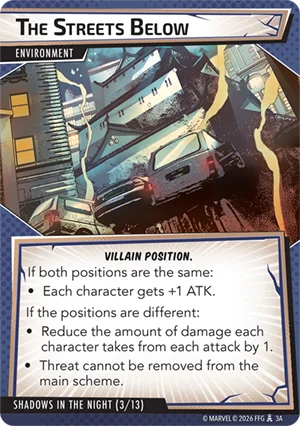
This battle takes place across two zones, referred to as “positions” within the scenario itself: Atop the Tenshu (Shadowland, 3B) and The Streets Below (Shadowland, 3A). These positions are represented by a pair of double-sided environment cards, one for the villain and one for the heroes. The villain version has the same effect regardless of which position it’s set to, granting an ATK bonus to all characters when the villain and hero positions are the same and inflicting penalties on the players when they’re different. The hero version of this environment card provides ways for the players to change their position, with Atop the Tenshu (Shadowland, 4B) having different costs to do so than The Streets Below (Shadowland, 4A).
Managing your position relative to the villain’s is crucial to handling this scenario effectively, and you can bet that the bad guys aren’t going to just sit still in one place. Minions like Black Tarantula (Shadowland, 5) and treacheries like Chaos in Hell’s Kitchen (Shadowland, 10) can change the villain’s position on a dime, while cards like Strategic Positioning (Shadowland, 8) and Moonlit Silhouette (Shadowland, 11) have varying effects depending on where the villain currently stands. This creates a deadly game of cat and mouse, in which you’ll have to decide when to give chase and when to hold back to wait for a better opportunity to present itself. And depending on the exact villain you’re facing, you’ll have another layer of challenge to face on top of it.

You read that right: as we implied above, and similar to the non-Kingpin scenarios of Fear No Evil, the Shadows in the Night scenario does not have a set villain that you face every time you play it. Instead, you’ll face one of six possible villains: Archpriestess (Shadowland, 12A), a possessed Daredevil (Shadowland, 13A), a possessed Elektra (Shadowland, 14A), Gorgon (Shadowland, 15A), Lady Bullseye (Shadowland, 16A), or a possessed White Tiger (Shadowland, 17A). Each of these Dark Protégés has their own unique fighting style, and they each come with a batch of linked cards that only get shuffled into the encounter deck if they’re the chosen villain.
For example, if the villain is Elektra, Lady Bullseye, or White Tiger, they can use Art of the Kill (Shadowland, 18) to put a target on your back, where if the villain is Archpriestess, Daredevil, or Gorgon, they can defend themselves with Krahllak’s Blessing (Shadowland, 19). Similarly, if the Dark Protégé in question is a Hand loyal, their Darkness Within (Shadowland, 26) can force you out of the relative safety of alter-ego form, while a possessed hero that is Embraced by Darkness (Shadowland, 27) can swiftly accelerate their shadowy plans. Each possible villain has five linked cards within the Dark Protégé encounter set, leading to a highly variable experience depending on which Protégé you face!
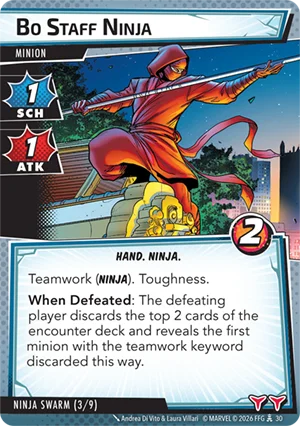
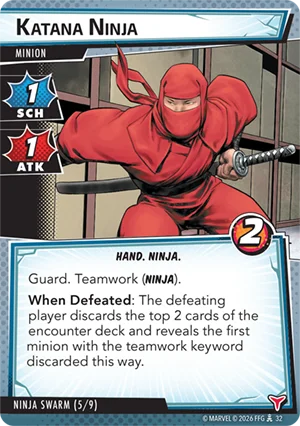
Of course, the Dark Protégés are not the only minions of the Hand standing in your way. The organization also has a swarm of ninjas at its command, represented by the aptly-named encounter set, Ninja Swarm! You’ll find seven different Ninja minions in this set, and they’re all skilled at working together. Most of these minions—such as Bo Staff Ninja (Shadowland, 30) and Katana Ninja (Shadowland, 32)—come equipped with the teamwork keyword, allowing them to ambush the heroes when they enter play. Thanks to these minions’ When Defeated abilities, more ninjas can leap into the fray to replace those that are knocked out. Cards like the imposing Black Mountain (Shadowland, 28) and the side scheme Dancing Shadows (Shadowland, 35) can make getting rid of these ninjas that much harder, and with Countless Numbers (Shadowland, 36) returning them the encounter deck, they just keep coming back!

A Twisting Labyrinth
After facing off against the Dark Protégés outside Shadowland, it’s time to venture into the dangerous maze of the fortress itself!

In the beginning of the pack’s second scenario, Shadow Labyrinth, the “villain” is not a person, but rather the Shifting Corridors (Shadowland, 37) that make up the vast majority of Shadowland. The corridors don’t attack or scheme, instead removing a “passage counter” each time they would activate (and also reveal a trap card, which we’ll get to in a bit). These passage counters serve as a time limit for the first half of the scenario, in which the heroes venture Into the Labyrinth (Shadowland, 38B) and try to find their way to the heart of Shadowland. Your goal is to remove all threat from the main scheme before all passage counters are removed from Shifting Corridors—do that, and you’ll enter the Chamber of Vile Secrets (Shadowland, 39B), in which you’ll face off against another Dark Protégé.
In both phases of the scenario, you’ll have to deal with the trap deck, a special side deck full of TRAP! cards that provide dangerous and difficult choices whenever they’re revealed. Each TRAP! card (with one exception) has three possible outcomes you can choose from: “Avoid,” “Disarm,” and “Trip,” with different effects depending on which one you choose.
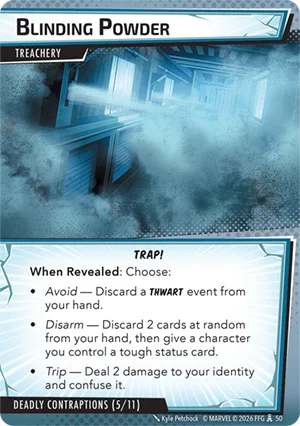
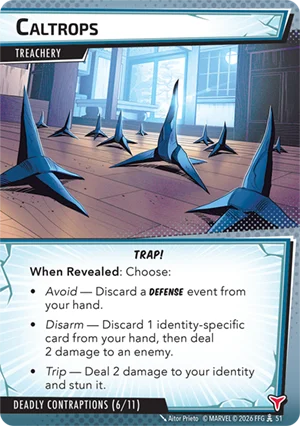
For example, Blinding Powder (Shadowland, 50) can be avoided if you discard a Thwart event or disarmed if you discard 2 random cards (and you’ll gain a tough status card as a bonus). If you can’t do either—or don’t want to—then you’re forced to trip the trap, taking 2 damage and confusing your identity. In a similar vein, Caltrops (Shadowland, 51) require you to discard a Defense card to avoid them or discard an identity-specific card to disarm them (and toss them at an enemy for some damage); if you trip the trap, you’ll take damage and get stunned.
Of course, there’s more than just traps in the Deadly Contraptions encounter set. Outside of the trap deck, Hand member Iron Monk (Shadowland, 47) stops you from avoiding traps, and Nervous Jitters (Shadowland, 46) can make them riskier to avoid or disarm. The Hall of Punishment (Shadowland, 48), true to its name, will punish you for taking the “easy” way out when you trip a trap, while the Path of a Thousand Cuts (Shadowland, 49) makes doing anything other disarming traps a much deadlier task.
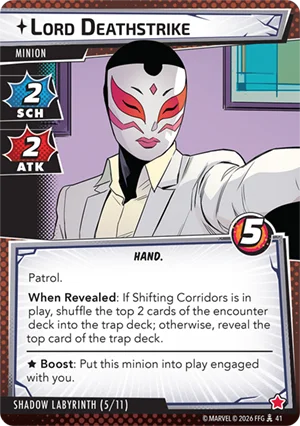
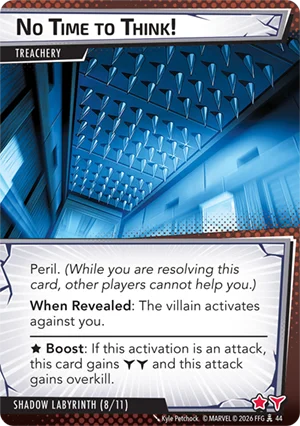
Speaking of deadly, there’s more to contend with in the Shadow Labyrinth than just the trap deck. Lord Deathstrike (Shadowland, 41) can add additional encounter cards to the trap deck, and his patrol keyword prevents you from thwarting the main scheme. Hazards built into the fortress itself harass the heroes at every turn, from Sudden Shifts (Shadowland, 45) in the layout to frustrating Dead Ends (Shadowland, 42) that you’ll have to smash your way through. You may even find yourself in a perilous situation with No Time to Think (Shadowland, 44), and your friends won’t be able to help get you out of it!

Heart of Shadow
Finally, after infiltrating Shadowland and fighting your way to its core, you find yourself face-to-face with the leader of the Hand himself, Krahllak!
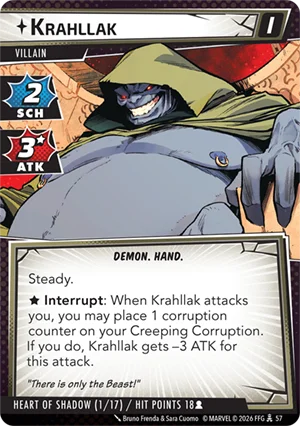
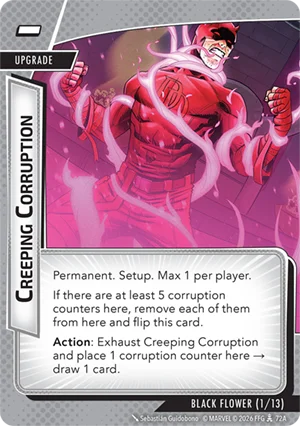
A dangerous demon and master of dark magic, Krahllak (Shadowland, 57) has no qualms about fighting dirty. Right out of the gate, he inflicts each hero with Creeping Corruption (Shadowland, 72A), tempting you with the allure of dark power. Give into that temptation, and you may find yourself having an easier time facing off against the leader of the Hand, but delve too deeply into darkness, and it may become overpowering (Shadowland, 72B), twisting you into yet another Dark Protégé!
Of course, Krahllak himself is not going to simply sit there and wait for the darkness to consume you. He wants you to give into the corruption, so his entire kit revolves around offering you opportunities to willingly gain corruption counters. His attacks hit like a truck, but you can gain a bit of corruption to reduce his strength. The Veil of Nightmares (Shadowland, 70) takes a lot of thwarting to get rid of, but you can accept a bit of corruption to remove big chunks of threat at a time. Meanwhile, the Snakeroot Elders (Shadowland, 69) make you choose between taking the corruption yourself or letting them have it, which only makes them stronger.
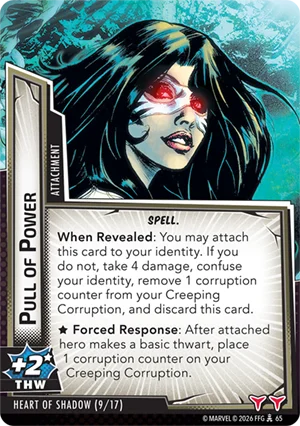
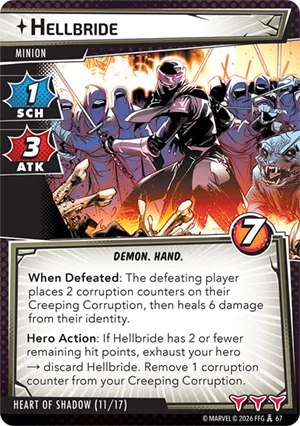
Krahllak’s power is overwhelming, and occasionally giving into the Creeping Corruption may be unavoidable. Thankfully, there are a few ways to remove corruption counters as well, allowing your hero to resist the dark temptations. Mark of the Wicked (Shadowland, 64) and Pull of Power (Shadowland, 65) both provide significant boosts to your hero’s ATK and THW respectively, but if you can resist the urge to accept these gifts (and survive the kickback), you’ll remove a corruption counter. The minion Hellbride (Shadowland, 67) can reward you for exercising restraint with her Hero Action ability, or you can choose to defeat her outright for a significant burst of healing, at the cost of some corruption. Finally, if you choose the latter option of Submit or Suffer (Shadowland, 71), you’ll remove a corruption counter and maintain your freedom—just brace yourself for one of Krahllak’s monstrous attacks!

Against the Shadow
Between Krahllak’s dark magic slowly corrupting the heroes and his swarm of Hand ninjas overwhelming them, the defenders of Hell’s Kitchen are going to have their work cut out for them. Look forward to taking on the forces of the Hand when the Shadowland Scenario Pack arrives this October!
You can preorder your own copy of the Shadowland Scenario Pack (MC65en) at your local retailer or online through our webstore today!
Written by Peter Schumacher
Marvel Champions: The Card Game is a cooperative Living Card Game® set in the iconic Marvel Universe. As villains attempt to carry out nefarious scehemes, it’s up to you and up to three other players to take on the role of a Marvel Hero and thwart evil wherever it rears its ugly head!